A Time To Share

Our God is a God of Nations:
"He so love the WORLD ... He gave His one and only son..."

Tuesday, 26 December 2017

STEW PIG'S TAIL AND PEANUT


Soft and juicy peanuts
in thick, dark porky gravy,
do you like it?

Peanuts take long hours of cooking, 
so normally it is  soaked overnight,
and
boiled until almost done before adding the pig's tail.

Well, what is the ratio?
No fixed ratio, depend on how big is the tail that you bought
and how much peanuts you have in the pantry!

Simply smash a piece of old ginger and add to the boiling stew.
This is a must to remove the smell from the pork.

The rest of the seasoning includes
ground pepper, both dark & light soya sauce, sugar and salt.
Of course, for added flavour you may add herbs like clove, star anis and cinnamon sticks.

To achieve that thick gravy,
opt for long hours of slow cooking.

Enjoy

SOYA SAUCE DRESSING


This Soya Sauce Dressing
looks like any of the store bought soya sauce.

There is not much difference in colour & thickness,
but 
the taste has been greatly improved!

Thank you Jeffrey Fong for sharing this marvelous sauce recipe,
that can be used on any dishes.

Simply pour it on boiled vegetables, chicken, pork or fish
and it brings out the taste wonderfully.

You can even use it as a dipping sauce.

Cooking meat? 
No problem, just use it as seasoning in stew.


The ingredients are simple.
Get a good quality soya sauce, Maggi seasoning sauce and some rock sugar.

Here is the recipe provided by Jeffrey Fong:

1 bottle Superior light soya sauce (640ml)
250g rock sugar
1 Tbsp Maggi seasoning soya sauce
1100ml water

1) boil water & rock sugar until sugar is dissolved
2) turn off fire and let it cool completely
3) stir in the rest of the ingredients, and bottled up
4) leave in the fridge until required.
5) when using, no need to re-boil, just pour onto the food
6) add some garlic oil, shallots oil or sesame oil
7) some crispy fried shallots or garlic will add more flavour to the dish.
8) enjoy

BOILED VEGETABLE


Boiled Vegetables

Often times we wonder why we cannot maintain the colour of greens after cooking.

When stir frying, we tend to over cook it.
When boiling it, we tend to leave it in the hot water for too long.
So, the problem is over cooking!


These are some of the tips to boil vegetables:

1) ratio of water to vegetable should be about 2:1, 
    as too little water will bring the temperature down when vegi is added
2) bring the water to rolling boil 
3) drain the vegetable well while waiting for the water to boil
4) add some oil & salt to the boiling water prior to adding the vegetable
5) do not turn down the flame when vegi is added, continue on high heat
6) when small bubbles appear by the sides of pan, it is ready to dish out the vegi!
7) pour sauce & oil over the vegetable to cool down
8) serve warm


Monday, 25 December 2017

SAMBAL HAEBEE - HAEBEE HIAM


Sambal Haebee
gives a finishing touch to whatever food that you are having.

I express my special thanks to my Facebook friend
Ding Mee Ling
from Sitiawan
for this Classic Nonya recipe

It may be time consuming to prepare
but it really worth the trouble.
Remember, never reduce the amount, you will regret cooking too little!

Ingredients:
500g dried shrimps, soaked & chopped 
600g shallots, peeled & sliced
1 bulb garlic, peeled & sliced
10-15g dried chilli, soaked & sliced
5-10 fresh chilli, big
5-10 chilli, spicy type
8 lemongrass, white part only
3" fresh turmeric
1" belacan
1 ball assam jawa. add water & squeeze out juice
10 limau perut leaves, torn 1/2 (optional if you do not have)
brown sugar & salt to taste

1. blend shallots, garlic, lemongrass all chillis, turmeric & belacan together
2. heat kuali and fry chopped dried shrimp until dry, remove
3. heat 2-3 cups oil in the kuali, add the blended ingredients & fry until fragrant 
4. when oil emerge from the chilli, add the fried dried shrimp
5. add limau perut leaves, if used
6. add assam jawa juice, brown sugar & salt to taste
7. leave to cool before storing in bottles

SINGLE PROOF PANETTONE


Single Proof Panettone


I tried Iginio Massari’s panettone recipe
Found in wildyeastblog.com. 
The panettone was so flavourful, nice and spongy, 
even though I did not get it done properly.

The 1st dough rose beautifully.
I thought maybe I could do something to shorten the waiting time
by incorporating some of the ingredients in the Final dough to it.

However, I still have to build The Stiff starter as stated in his recipe, no short cut!
This recipe yields 3 nos. 5.25” panettone.
Sharing with you this Single Proof Panettone adapted from Iginio Massari's recipe:-

Step 1
To build The Stiff Starter:
Sourdough is fed frequently & maintain at room temperature
to render it less acidic than a typical sourdough.
1. Convert SD to 50% hydration over several days
2. Once converted, continue feeding 4 hourly
3. Final feeding should be given 4 hours before mixing the dough

Method
1. convert sourdough from 100% to 50% hydration over several days.
2. Once achieved,
     mix 20g of 50% hydration sourdough with 20g flour & 20g water, ferment for 4 hours
3. Repeat feedings at 4 hour intervals,
     each time discarding all but 20g starter, and feed with 20g flour & 10g water
4. For nightly feeding before going to bed, use only 10g starter with 20g flour & 10g water
5. For last feeding (4 hours before mixing the dough),
     feed with 40g starter, add 40g flour & 20g water

INGREDIENTS

(A)  346g bread flour
        190g water
        1/2 tsp instant yeast
        83g sugar mixed with seeds from 1/2 vanilla pod
        55g egg yolk
        1.5 tsp diastatic malt powder
        83g salted butter, at room temperature
        86g stiff starter
        Zest from 1/2 orange

(B) 100-120g raisins, sultanas & orange peels

Glaze (optional)
83g granulated sugar
2 tsp ground almonds
1.5 tsp vegetable oil
1 Tbsp corn flour
1,1/8 tsp cocoa powder
30g egg white

Topping (optional)
Powdered sugar
Swedish pearl sugar
Whole Blanched almond

Special supplies
Three 5.25” paper panettone mold
6 bamboo skewers to skewer through the molds

Method
1. Build sweet starter over a period of several days. Final feeding should be given 4 hours before mixing the 1st dough
2. In a stand mixer, combine all ingredients (A) and mix for 14-15min.
3. At the last 1 min of mixing, add the dried fruits & continue mixing until the mixer stops.
4. Divide and shape dough into 3 portions. Place into the panettone molds to Proof.
5. Proof for 5-6 hours,
     until the top of the dough dooms & the sides are about 1” below the top of molds.
6. Preheat oven 175’C with lower rack in the oven.
7. If glazing the panettone, whisk together all glaze ingredients.
     Brush generously over the top of the loaves.
     Sift powdered sugar generously over the top,
     then sprinkle with pearl sugar & garnish with blanched almond.
8. If not glazing, use scissors to snip an X on the top of the loaf & tuck a pat of butter inside.
     You can also leave it plain as shown in the photo above
9. Place loaves on the oven rack & bake for 35-40min until the tops are brown.
     Tent bread if the tops get too dark.
10. While the panettone is baking, set up the hanging apparatus.
       When bread is done, hang them as quickly as possible.
       Hang for at least 4 hours, up to overnight.


Friday, 15 December 2017

FUN & PUN

Fun and Pun
Received this, thought it may be good for a laugh...
Thanks to the person who wrote it

*Q: Can February March?*
*A: No. But April May!*

*Q: Did you hear about the painter who was hospitalised?
*A: Reports say it was due to too many strokes!*

*Q: Have you heard the joke about the butter?*
*A: I better not tell you, it might spread!*

*Q: How do you know that carrots are good for eyesight?
*A: Have you ever seen a rabbit wearing glasses?*

*Q: Music Teacher: What's your favourite musical instrument?*
*A: Kid: The lunch bell!*

*Q: What did the triangle say to the circle?*
*A: You’re pointless!*

*Q: What do you call a person that chops up cereal*
*A: A cereal killer!*

*Q: What kind of emotions do noses feel?*
*A: Nostalgia!*

*Q: Where do boats go to when they get sick?*
*A: The dock!*

*Q: Why can't a leopard hide?*
*A: Because he's always spotted!*

*Q: Why did the tree go to the dentist?*
*A: To get a root canal!*

*Q: Why was the maths book sad?*
*A: Because it had too many problems!*

Thursday, 14 December 2017

PEANUT BUTTER MELT IN THE MOUTH COOKIES

Peanut Butter Melt In The Mouth Cookies


Peanuts Butter is a common spread for bread.
My hubby is a fan of peanut butter.
He likes it creamy.
Many people like it crunchy.

Whether creamy or crunchy, you can easily turn it into a cookie.

Sharing with you here,
 a tender, crumbly, melt in the mouth Peanut Butter Cookies.


Peanut Butter Melt In The Mouth Cookies

240g peanut butter
12Og  icing sugar
1 large egg yolk
Pinch of salt
  1. Preheat over to 180’C
  2. Combine all ingredients in a bowl
  3. Divide into 15g portions & form into a ball
  4. Arrange the balls on a lined baking sheet & press criss-cross with a fork
  5. Bake for 15-20min until slightly brown
  6. Cool on tray for awhile before transferring to the wire rack
  7. store in air tight container

Sunday, 10 December 2017

NUTRI SOURDOUGH SOFT TOAST


Sourdough Bread making can be tedious,
especially you need to wait long hours for the dough to proof.

This is a single proof recipe,
baked on the same day, if you have sufficient time to work on it.

If you do not have a bread machine,
and 
lazy to knead with your palms,
use the stand mixer with the dough hook.
I assure you, it can do the job beautifully.

The procedure can be done in one or two days, 
depending on the flexibility of your time.
It involves 2 stages of preparation of
1. sourdough
2. main dough

Nutri Sourdough Soft Toast

Day 1
Preparation of sourdough, night before
mix together & leave to rise at room temperature until double or up to 24 hours
25g cold sourdough from fridge
25g water
25g bread flour

Day 2
anytime from morning to the afternoon,
stir in 50g water & 
          50g bread flour,
and leave to rise at room temperature, until 2 times its original volume.
It will take about 2 hours. Can do a float test to see if it is ready.

Main dough
150g sourdough starter from the above, use at its peak
165g bread flour
30g spelt flour
3/4 tsp salt
40g sugar
1 egg
55g milk
20g butter/oil

1. knead together all ingredients for 10-15min. depending on the power of your mixer,
    until window panes is reached.
2. shape into a loaf & leave to proof at room temperature until 3X its size (about 3 hours)
3. bake in preheated oven 190'C for 30min
4. tent bread with aluminium foil if it gets too dark on the top.

Notes:
If you suddenly remember you need a loaf of bread for tomorrow
1) Prepare starter
Take out 60g cold sourdough starter from the fridge, stir in 50g water & 50g bread flour and leave aside at room temperature to rise until 2X its original volume. This will take about 3 hours (1 hours longer than the above recipe).
2) Main dough
Follow Steps 1-4. When shaping is done, leave the bread dough on counter top to proof until 2X its original size (takes about 5-6 hours). Cover & leave in the fridge overnight. Next day, remove from fridge & leave on counter top to continue proof another hour until 3x in size. Bake as recipe.

Monday, 27 November 2017

CRISPY TERIYAKI CHICKEN


Crispy fried chicken
in thick teriyaki sauce

Easy to cook and nice to eat.

Teriyaki Chicken
2 chicken thigh, de-boned
corn flour for dusting

Seasoning: mix together in a small bowl
1-2 Tbsp teriyaki sauce
1/2 tsp sugar
1 tsp soya sauce
1/2 cup water

Thickener: 1 tsp corn flour + 2 tsp water

1. heat enough oil to cover the base of a frying pan.
2. coat chicken in a plate of corn flour, shake away the excess
3. when oil is hot, put in one piece of chicken thigh, fry until golden & cooked through
4. remove & drain on a piece of kitchen towel. Fry the next piece
5. when done, pour away the oil & cook seasoning in low heat 
6. when the seasoning starts to boil, add thickener. dish out into a bowl
7. to serve, cut chicken into bite size & pour sauce over the chicken

Sunday, 26 November 2017

OYSTER SAUCE PORK BELLY


Chunks of Pork Belly
cooked in oyster or dark soya sauce
is Hayley & Ethan's favourite

The gravy is thick and the pork belly is juicy. 

To achieve the glossy look
and 
the juicy pork,
fry it in the pan until fragrant before adding water


Oyster Sauce Pork Belly
1 long strip of pork belly, cut into chunks
1" old ginger
3 pips of garlic, whole

1. heat up frying pan, and put pork belly, garlic & ginger into a pan, turning often. 
2. fry until fragrant and the pork shrinks
3. drizzle some water around the sides of pan
4. add oyster sauce, dark soya sauce, salt, pepper & sugar to taste
5. cook until done. Run a chopstick into the meat, if it goes through easily, it is done.
6. dish out & serve

Note:
a dash of sugar added will do wonders to this dish.

EASY LASAGNA


My grandchildren love lasagna
but often times the herbs and other ingredients are far too much for them to enjoy.

I have this simple and easy to cook lasagna
using their favourite spaghetti sauce:


As for the pasta
I get these dried pasta sheets


Easy Lasagna
200g ground lean beef
1 bottle spaghetti sauce, any of your choice
1 cup milk, divided
1 large onions, chopped
mozzarella cheese
6 pasta sheets 3.5"x7", dry type
4 slices cheddar cheese for topping

1. fry onions with some olive oil in the pan, until fragrant
2. add minced beef & fry
3. add spaghetti sauce & cook until beef is almost done, add 1/2 the milk
4. remove from heat
5. spoon 1/4 of the sauce into a 7" square pan
6. sprinkle mozzarella cheese on the sauce
7. cover the sauce with a layer of pasta sheet, spread 1/4 of the sauce on top
8. sprinkle cheese & repeat No.7
9. on top of the last spread of sauce, arrange the cheddar cheese
10. drizzle the remaining 1/2 cup of milk around the sides of pan
11. bake covered with aluminium foil in preheated oven 190'C for 20min
12. remove foil & bake another 25min
13. allow lasagna to cool for 15min before serving

NO BAKE OREO CHEESECAKE


Cheesecake made with Oreo biscuits
this is what I am referring to.

Yes, my grandchildren love cheesecake
and
they like Oreo biscuits
so
I combine them both and they say
"yummy"

Thanks to Adeline Song Jun Ling
who advised me to retain the cream from the biscuits
and 
cream together with the cheese.

The cake comes out great!

Oreo Cheesecake

Base: 170g oreo biscuits, cream removed
          70g butter, melted

Filling:
1 Tbsp gelatin
80g hot water
250g cream cheese, room temperature
90g Oreo cream + sugar
200ml whipping cream
80g milk
1 tsp lemon juice (optional)

Topping: 8 pieces oreo biscuits, broken into 3s or 1/4s

1. crush oreo biscuits until fine, mix in melted butter
2. press firmly into the base of a 7"pan
3. leave to chill in fridge for 2 hours
4. dissolve gelatin in hot water, and allow to cool. Heat up if necessary.
5. whip cream & leave aside
6. cream cheese with sugar mixture until blended
7. add whipped cream, gelatin mixture and milk
8. pour filling on to the oreo biscuit base
9. break oreo biscuits & arrange on top of the cheese filling
10. chill for 4 hours before serving 

Sunday, 12 November 2017

OVEN BAKED CRUNCHY CHICKPEA


Thank you Sherry Peris
for sharing this recipe.

Never realised that it could be done so easily!


Oven Baked Crunchy Chickpea

200g chickpea -
1. soak overnight
2. boil until soft
3. dry with kitchen towels & leave to air dry
4. season with garlic salt, salt or any of your favourite herbs 
5. bake in preheated oven 230'C for 30-45 min until browned & crunchy

NATURALLY YEASTED SOURDOUGH ORANGE MINI LOAF


This is Orange flavoured Mini bun
is naturally yeasted,
combining both orange yeast water and sourdough

It has a strong Orange flavour
with added orange peel to enhance its flavour.

No milk and no egg is required.

Just orange yeast water


Sourdough Orange Mini Loaf
200g stiff starter, 50% hydration
250g bread flour
70g wholemeal flour
250g orange yeast water
40g sugar
1 tsp salt
70g orange peel & raisins

1. starter, flours, yeast water and sugar into the bread machine, bread dough cycle 30min
2. 3 min before the programme ends, add salt & fruits
3. remove, shape & place in mini loaf pans
4. allow to proof at room temperature until about 75% more of its original size
5. cold retard 12 hours
6. remove loaves from fridge & thaw for 1.5 hours
7. bake in preheated oven 200'C 1st 15min. another 20min at 175'C (total 35min)

Thursday, 9 November 2017

PINEAPPLE LATTICE PIE


I like pineapples
I like sweet pineapples
Just discovered that I love pineapple pie

The pineapple filling is juicy and sweet with a tint of sour, 
and 
the crust is crispy and fragrant


I have adapted this recipe from 

The preparation in 2 stages
1st the filling, then follow by the pie crust

Pineapple Filling (chunky type)
300g pineapple, diced
60g sugar
1/16 tsp cinnamon powder
2 cloves
1/2 Tbsp cornstarch

1. combine pineapple pieces, sugar, cinnamon powder & cloves in a pot
2. leave aside for 10min for the pineapple to release the juice
3. cook on medium heat until the pineapple turns translucent & soft
4. remove cloves, stir in cornstarch & return to heat
5. continue cooking until slightly thicken
6. allow filling to cool down before using

Pie Skin
150g all purpose flour
80g cold salted butter
1/2 Tbsp icing sugar
25g whipping cream
1 Tbsp water (if needed to bind the dough)
egg yolk for eggwash

1. rub butter into flour & icing sugar
2. add whipping cream when mixture resembles fine bread crumbs
3. gently press dough to form a lump, add water if necessary
4. cover the dough & chill for 1 hour
5. remove dough from fridge & roll 3/4 of the dough between 2 sheets of plastic
6. fit the rolled dough into a 6" pie dish, gently press down the bottom & sides
7. roll out flat the balance dough between 2 plastic also
8. put both the pie base & rolled dough to chill while preheating the oven to 180'C
9. place filling into pie base & level it
10. form lattice top with the rolled dough cut into strips
11. to have a neat sides, go round it with strip of dough
12. egg wash the pie before sending into the oven
13. bake for 40min until done.

CANDIED ORANGE PEEL


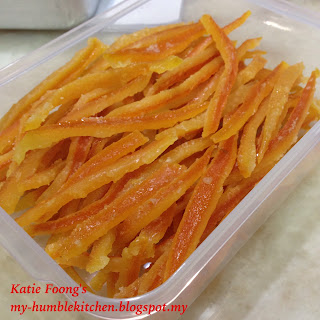
Candied orange peels 
are good as a snack
and 
as ingredients for some fruity bakes like cakes and bread

Homemade ones are fresh and the taste is marvelous.

Candied Orange Peel
3 large Sunkist oranges
280g sugar
180g water

1. rinse the oranges & cut the top & bottom off the orange
2. cut the fruit into quarters & remove the skin
3. cut the skin into strips & scrape away part of the white pith
4. bring to a boil the orange strips with enough water to cover it
5. once boiled, drain & repeat (4)
6. stir together sugar & water in a pot, bring it to simmer
7. add the peel and continue to simmer until the peels appear translucent.
    Do not stir to avoid crystalization, but can swirl the pot or press in the peels
8. remove peels & spread to dry, may take a day or 2
9. store in air tight containers or fridge

Wednesday, 8 November 2017

LONG BEAN ONE POT RICE


Long Bean one pot rice
sounds easy

 Not so, if you want to add colour to your meal.

The ingredients are:


Method
1) rinse rice & add sufficient water for working, leave aside
2) fry beaten egg as if a pancake. Then roll up & cut into strips
3) fry long beans until slightly soft, remove
4) add 1 Tbsp oil into the pan & fry garlic until fragrant
5) add soaked dried prawns & continue stir frying
6) transfer the fried dried prawns into the rice pot or steamer to cook together
7) when done, add fried long beans & egg strips & chili (if using)
8) serve 

Sunday, 5 November 2017

ORANGE YEAST WATER FRUITY TOAST


A Soft Toast 
baked with Orange yeast Water.

Besides raisins, cranberries and orange peel
I added grated rind from one orange
to get stronger orange flavour.


Orange Yeast Water Fruity Toast
(A) 10g each of raisin, cranberry & orange peel
       enough yeast water to cover & soak the fruits for an hour

(B) 120g active Sourdough, fed with orange yeast water
       200g bread flour
       100g (1 egg + fresh milk)
       1.5 Tbsp sugar
       1/2 tsp salt
       25g butter

(C) zest from 1 orange

1. knead all ingredients in the bread machine, bread dough cycle
2. before the machine stops, add the strained fruits & orange zest
2. when the machine stops, rest for 15 min, shape & put into an oiled loaf pan
3. allow to proof until 2.5 the volume, about 3 hours at room temperture
4. bake in preheated oven 175'C for 35min

PRUNE BUTTER CAKE


If you like prunes and butter cake
combine them and
you will get Prune Butter Cake
2 in 1

This Prune Butter Cake 
is quite dense & moist
and 
is flavourful.

It can either be served warm or at room temperature,
and are just as nice.

I have adapted this from Ann Low's recipe

Ann Low has it baked with rum liqueur or brandy, with prunes cut into small pieces
whereas
I prefer it to be fruity with large pieces of prunes.

Prune Butter Cake
A) 100g pitted prunes
      1 small orange, juiced

B) 170g cake flour sifted with
     1 tsp baking powder

C) 150g butter, softened
     125g caster sugar
     3 AA eggs
     1 tsp vanilla extract
     1 Tbsp fresh milk

1. Soak prunes in orange juice for an hour, steam over low heat to soften.
    Remove from heat & let cool. When cooled, drain & slice open the prunes.
2. Line a 7" round pan with parchment & preheat oven to 180'C
3. Cream butter & sugar until light
4. add eggs, one at a time. Mix well after each addition
5. add vanilla extract & juice from steam prunes
6. Gently fold in sifted flour & baking powder
7. add 1 Tbsp fresh milk and fold the batter until smooth
8. pour 1/3 batter into prepared cake pan, arrange 1/2 of the sliced prunes over it
9. repeat (8), and finally topped with the balance 1/3 batter
10. bake in preheated oven 180'C for 35min, or until done
11. Leave cake to cool in pan for 10min, remove & cool on wire rack.      

MUA CHEE


Thank you Emily Koh
for such an easy recipe

Steaming in an Electric Lunch Box 
is simply fuss free.

Once everything is mixed 
and put into the steamer,
switch on,
you can come back anytime to serve it!

Like to try Emily's Recipe?

Mua Chee
100g glutinous rice flour
90g water
1 Tbsp oil

1) mix them up in a steaming bowl
2) steam it until light goes off 
3) serve with grounded peanuts and caster sugar

Note:
If you do not have an Electric lunch box, just steam it for 20min, or until cooked


Friday, 3 November 2017

YEAST WATER SWEET POTATO BREAD


Calamasi (Asian Lime)
takes longer time to ferment - 5 long days
and more sugar is required to speed up fermentation.

As a result
the yeast water is on the sweet side.
Moreover, the orange sweet potato that I bought also sweet!

Now I have a sweet bread. 

Watch out! It browns easily when baked.


Yeast Water Sweet Potato Bread
180g Bread flour
150g Sourdough fed with yeast water
70g yeast water
30g water, may need to adjust amount depending on the sweet potato 
50g steamed sweet potato, mashed
1 tsp salt

1. combine bread flour, sourdough and water, autolyse 45min
2. knead in salt & mashed sweet potato, allow to rest 45min
3. SNF twice at interval of 45min
4. cold retard 10hours
5. remove from fridge & shape, leave in banetton to proof 2.5hrs until risen
6. bake in preheated oven 250'C for 20min, covered
    bake another 20min @ 200'C  with cover opened.

Note: tent bread when necessary

Wednesday, 1 November 2017

PINEAPPLE FRIED RICE


Pineapple Fried Rice
is a popularThai Delicacy.

It is loved by many because of its
1) colourful presentation in the shell of a pineapple
2) mixture of taste, spicy, sweet & sour
3) mixture of texture, soft and yet crunchy because of the added cashew nuts

I have some sweet pineapples in the fridge
and
with the inspiration of Serena Kuan
I have come out with this simply pineapple fried rice
served in a plate.

Toasted Cashew nuts  must be added to get the authentic Thai

Pineapple Fried Rice
1 bowl cooked rice
a handful of prawns, skin removed
1 egg, beaten
1/2 Tbsp garlic, minced
1/2-1 Tbsp oil for cooking
ripe pineapples, cut into small slices

seasoning:
soya sauce, fish sauce, pepper

garnishing/topping:
spring onions, diced
red chilli, diced
fried shallots (optional)  

1) heat oil in a wok, fry garlic until fragrant
2) add prawns & fry
3) push ingredients to side of wok, pour beaten egg to the centre to cook
4) turn the egg when it is cooked, add rice 
5) stir fry everything together, add seasoning
6) lastly, add pineapple slices & garnishing 
7) dish out to serve

Note: reserve some garnishing for topping

STEAMED PUMPKIN KUIH


Pumpkin is versatile.
It can be used in cooking and baking.

The bright yellow of pumpkin adds colour to whatever you cook.
It can be a tray of yellow kuih,
some steamed yellow buns or crusty baked loaves.

I have adapted this recipe from
Rebacca Tan's post in the Facebook


Steamed Pumpkin Kuih
125g pumpkin without skin, shredded
190g water
80g rice flour
30g tapioca flour
20-25g dried shrimp, soaked & coarsely diced
1/2 Tbsp garlic, minced
salt & pepper to taste
1 Tbsp cooking oil

1. combine in a bowl, water, rice flour & tapioca flour
2. oil the bottom & sides of a steaming pan (5.5")
3. pour remaining oil into a hot pan & fry the minced garlic
4. add dried shrimp, continue frying until fragrant before adding shredded pumpkin
5. lastly, add in batter to cook until thicken
6. dish into the oiled steaming pan, level with a wet palm
7. steam for 30min, until cooked
8. Cool well before cutting
9. serve with cut chilli, fried shallots & cut spring onions
    or pan fried plain

Tuesday, 31 October 2017

STEAMED PORK RIBS WITH FERMENTED BLACK BEANS


Steaming is the easiest way of Chinese cooking.

Firstly, assemble the ingredients,
arrange them on a steaming dish,
and 
steam over boiling water.

Once done, the gravy is clear 
and at the same time,
all the goodness has gone into it.

I love cooking this way,
especially in my little Electric Lunch Box.

It saves a lot of work cleaning up of the utensils!

This Steamed Pork Ribs with fermented black beans
is a common dish in Dim Sum Restaurants.

The secret of having the ribs soft & juicy
is the addition of 'wonder powder', 
Corn Starch!

Corn starch is often used in Chinese Cooking
but how many of us really know its function?

It is used as a tenderizer for meat
and
to thicken up the gravy.

Besides this, it makes your food look glossy and appetizing!


Steamed Pork Ribs with Fermented Black Beans
250g pork ribs, chop into bite size
2 tsp corn starch
1 Tbsp water
1 tsp old ginger slices
1 tsp fermented black beans, rinsed
1 red chilli, chopped

Seasoning:
1 tsp sugar
1 tsp shaoxing wine
1/2 tsp sesame seed oil
salt & pepper to taste

1. marinate pork ribs with seasoning and leave aside for 1/2 hour or so
2. mix corn starch & water to marinated ribs
3. arrange ribs on steaming plate, add fermented black beans & ginger slices
4. cover & steam for 30min, or until the ribs are cooked
5. sprinkle chopped chilli on top and serve hot.

Sunday, 29 October 2017

PEPPER CORN PIG'S STOMACH SOUP


This Pepper Corn Soup
is popular among the Chinese.

Often times you can order this dish from a coffee shop
which offers simple stir fry dishes. 

It is also one of the popular Confinement Food.
Pepper corn and ginger has been added to expel 'wind' 

If you have a lot of bones left, be it chicken or pig's,
it can be used to cook this soup.

Why bones?
Pig's stomach needs long hours of cooking to soften,
and 
bone needs long hours of cooking to extract the collagen & nutrients.

So, it is just nice to pair them this way.

Of course, if you love to have some meat in the soup,
add it when it is almost done!

There is no exact measurement as how much to put in the soup.

The 2 important ingredients:
pepper corns and ginger, 
both smashed and added to give the extra ordinary taste of the dish!


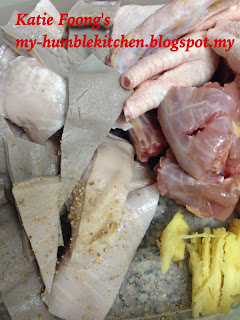
To clean the Pig's stomach:
1. snip off all fats from the surface of the pig's stomach
2. turn the stomach inside out, wash away the slime under slow running water
3. use a knife to scrap off the remaining sticky substance
4. drain, add 2-3 Tbsp salt & scrub as you would scrub your kitchen towel with your hands
5. add 2-3 Tbsp tapioca starch or corn starch, continue rubbing & scrubbing
6. rinse off the sticky substance & repeat 4 & 5
7. rinse & put into boiling water, cover & turn off heat. Leave aside for 15min
8. can leave to cool or just add tap water to cool down
9. use a knife to scrape off any loose white skin
10. the pig's stomach is now ready for cooking.